

对应路线图:Phase 0 (Day 1-21) | 内核 v6.6 | 上一篇:P0-02 NUMA | 下一篇:P0-04 无锁编程
一句话定位
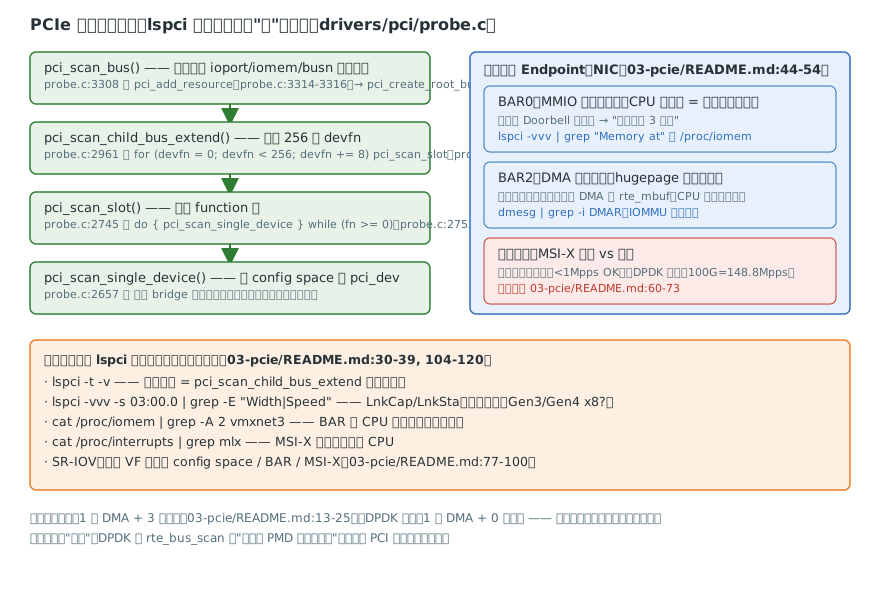
lspci -t -v 打出来的那棵树,是内核 pci_scan_bus 一行行代码扫出来的。看懂这三层枚举递归,就明白 BAR 是什么、网卡怎么 DMA 到 hugepage、以及 DPDK 为什么要把网卡从内核手里"抢"过来。
真实源码精读:内核枚举三层递归
第一层:入口(drivers/pci/probe.c):
struct pci_bus *pci_scan_bus(int bus, struct pci_ops *ops,
                    void *sysdata)              // probe.c:3308
{
    LIST_HEAD(resources);
    struct pci_bus *b;

    pci_add_resource(&resources, &ioport_resource);
    pci_add_resource(&resources, &iomem_resource);
    pci_add_resource(&resources, &busn_resource);      // probe.c:3314-3316
    b = pci_create_root_bus(NULL, bus, ops, sysdata, &resources);  // probe.c:3317
    if (b) {
        pci_scan_child_bus(b);                     // probe.c:3319
    }
    // ...
}
三种资源(IO 端口、内存映射、总线号)挂到 root bus 上——lspci 里每个设备的 Memory 窗口就是从 iomem_resource 里切出来的。
第二层:扫子总线(probe.c:2961):
    /* Go find them, Rover! */
    for (devfn = 0; devfn < 256; devfn += 8)
        pci_scan_slot(bus, devfn);                    // probe.c:2972-2973
PCI 总线最多 32 个 slot × 8 function,devfn 就是 (slot<<3)|function 的打包。
第三层:扫 slot 内的 function(probe.c:2745):
    do {
        dev = pci_scan_single_device(bus, devfn + fn);   // probe.c:2754
        if (dev) {
            if (!pci_dev_is_added(dev))
                nr++;
            if (fn > 0)
                dev->multifunction = 1;            // probe.c:2758-2759
        } else if (fn == 0) {
            /*
             * Function 0 is required unless we are running on
             * a hypervisor that passes through individual PCI
             * functions.
             */
            if (!hypervisor_isolated_pci_functions())
                break;                                // probe.c:2760-2767
        }
        fn = next_fn(bus, dev, fn);
} while (fn >= 0); // probe.c:2769-2770pci_scan_single_device(probe.c:2657)读 config space 的 vendor/device ID,识别出设备并建 pci_dev;发现是 bridge 就递归进下一层总线(子总线号继续涨)——这就是 lspci -t 树的由来。
实验怎么跑(README 03-pcie:104-120)
lspci -t -v                                          # 树形拓扑
lspci -vvv -s 03:00.0 | grep -E "Width|Speed"        # 链路协商带宽(LnkCap/LnkSta)
cat /proc/iomem | grep -A 2 "vmxnet3\|e1000"         # BAR 在物理地址空间的落点
dmesg | grep -i DMAR                                  # IOMMU 重映射
cat /proc/interrupts | grep -E "CPU|vmxnet3|e1000|mlx"  # MSI-X 向量分布
看点:① 你的网卡插在哪个 bridge 下面、链路是 Gen3 x8 还是 Gen4 x16——带宽上限 = 线速上限;② BAR0 是 MMIO 寄存器窗口(CPU 写 Doorbell = 给网卡下命令),BAR 区域是 DMA 目标内存(README 03-pcie:44-54 的图);③ 中断向量列告诉你包进来时哪几个 CPU 被打断——DPDK 直接把这个机制换成轮询(README 03-pcie:60-73)。
🐧 内核对照
| DPDK | 内核 | 关键差异 |
|---|---|---|
rte_bus_scan 枚举 PCI 设备 | pci_scan_bus → pci_scan_child_bus(probe.c:3308/2961) | 同一拓扑,DPDK 只关心"能被我 PMD 驱动的" |
| PMD 写 BAR MMIO 寄存器 | 内核驱动 io_remap BAR | 都是内存映射,DPDK 省掉内核层 |
轮询 rte_eth_rx_burst | MSI-X 中断 → NAPI 软中断 | README 03-pcie:60-73:中断适合 <1Mpps,轮询适合 100G |
| 收包 1 次 DMA + 0 次拷贝 | 1 次 DMA + 3 次拷贝 + 上下文切换 | README 03-pcie:13-25 的账本 |
面试 3 问
- 内核怎么枚举出整棵 PCI 树? →
pci_scan_bus挂三种资源建 root bus(probe.c:3314-3317),pci_scan_child_bus_extend以 devfn 步长 8 扫 256 个位置(probe.c:2972-2973),pci_scan_slot内层循环逐个 function、fn==0 不存在就 break(probe.c:2753-2770),遇到 bridge 递归。 - BAR 是什么、两种典型用途? → BAR 把设备寄存器/DMA 空间映射进 CPU 物理地址空间。BAR0 类 = MMIO 寄存器(Doorbell);BAR2 类 = DMA 目标(hugepage),见 README 03-pcie:44-54。
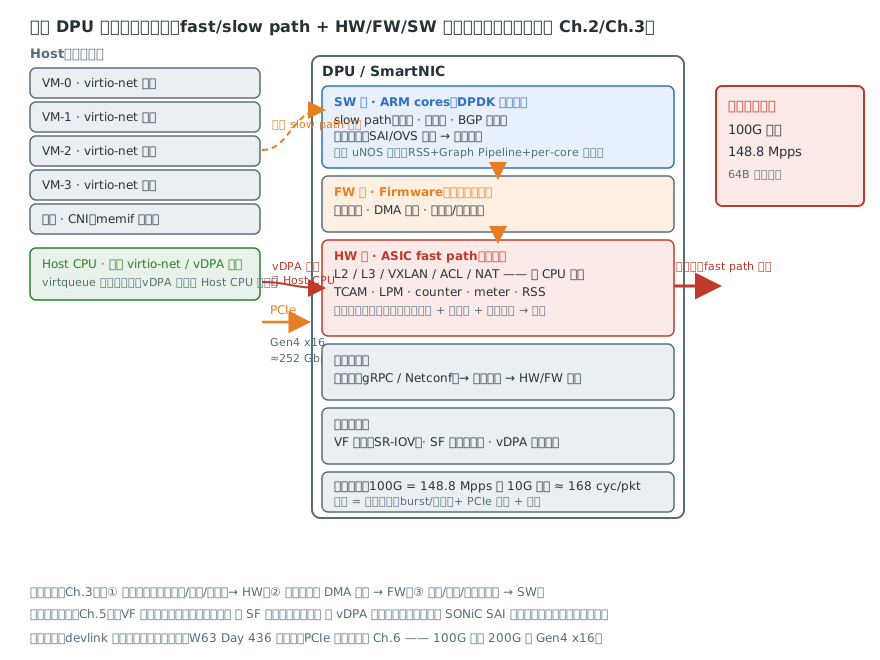
- 为什么 DPDK 用轮询而内核用中断? → 中断有上下文切换与不可预测延迟,100G=148.8Mpps 时中断风暴拖垮 CPU;轮询让 lcore 100% 占满换来了 <1μs 的可预测延迟(README 03-pcie:60-73)。代价是耗电——这正是 DPU 上"混合模式"的由来。
数据落点
perf-data/P0/03-pcie/:lspci-tree.txt、lspci-vvv-nic.txt(LnkCap/LnkSta)、iomem-bar.txt、interrupts.txt。
评论 (0)